 TodaysBru
Help
A guide to running your TodaysBru workspace — what each role can do, and how to set up teams, categories, SLAs, and automation. Admin-only steps are noted as such below. New to TodaysBru? Watch the demo.
Quick Start
Create your workspace, invite a teammate, and configure your first support workflow.
What is an admin?
TodaysBru has four roles. Each is a superset of the one before it — an admin can do everything an agent can, an agent everything a user can.
| Role | Can do |
|---|---|
| user | Submit tickets (web form, AI chat, email), track their own tickets, browse the knowledge base. Default role for anyone who registers. |
| agent | Everything a user can, plus: pick up unassigned tickets from their team’s queue, work tickets assigned to them, add internal or requester-visible notes, use the AI copilot tools (suggested resolution, suggest reply, summarize thread), and see the dashboard and hardware assets. |
| manager | Everything an agent can, plus: reassign any ticket already routed to their own team — granted by being set as that team's manager in Admin → Teams. |
| admin | Everything above, plus the Admin area: teams, categories, user roles, SLA targets, and workflow automation. There’s one admin tier — no per-team admin split beyond manager. |
You'll see the Admin link in the sidebar only if your account has the admin role.
Admin → Users lets you move people freely between
user, agent, and manager — but assigning or removing the admin role itself is deliberately left out of that dropdown, on purpose. If you need a second admin, contact your TodaysBru operator.Getting started
- Your workspace's first admin account is created when the workspace is provisioned — you'll get an email with a link to set your password.
- Everyone else creates their own account from your workspace's login page by clicking Register, which creates a
user-role account. If your workspace restricts registration to a specific email domain, only addresses on that domain can register — ask your TodaysBru operator whether yours does. - Accounts are also created automatically the first time someone emails your helpdesk address or messages the Slack bot, if one is connected — not everyone needs to register by hand.
- Once someone has an account, promote them to
agentormanagerfrom Admin → Users as needed.
Running support on your own
TodaysBru only notifies the agent a ticket is assigned to, and new tickets start unassigned unless a category routes them. With a team that's fine — someone is always watching the queue. If you're the only person doing support, it means you won't hear about a new ticket (or a reply on one) until you open the app.
The fix is two workflow rules, and Quick Start adds both in one click: go to Quick Start → Automate something → Add the solo rules.
- Solo desk: assign new tickets to me — every new ticket with no one assigned is assigned to you, and you get an email. Since you're now the assignee, requester replies email you too.
- Solo desk: remind me about waiting tickets — if a ticket is still open 4 hours after it came in, you get one reminder.
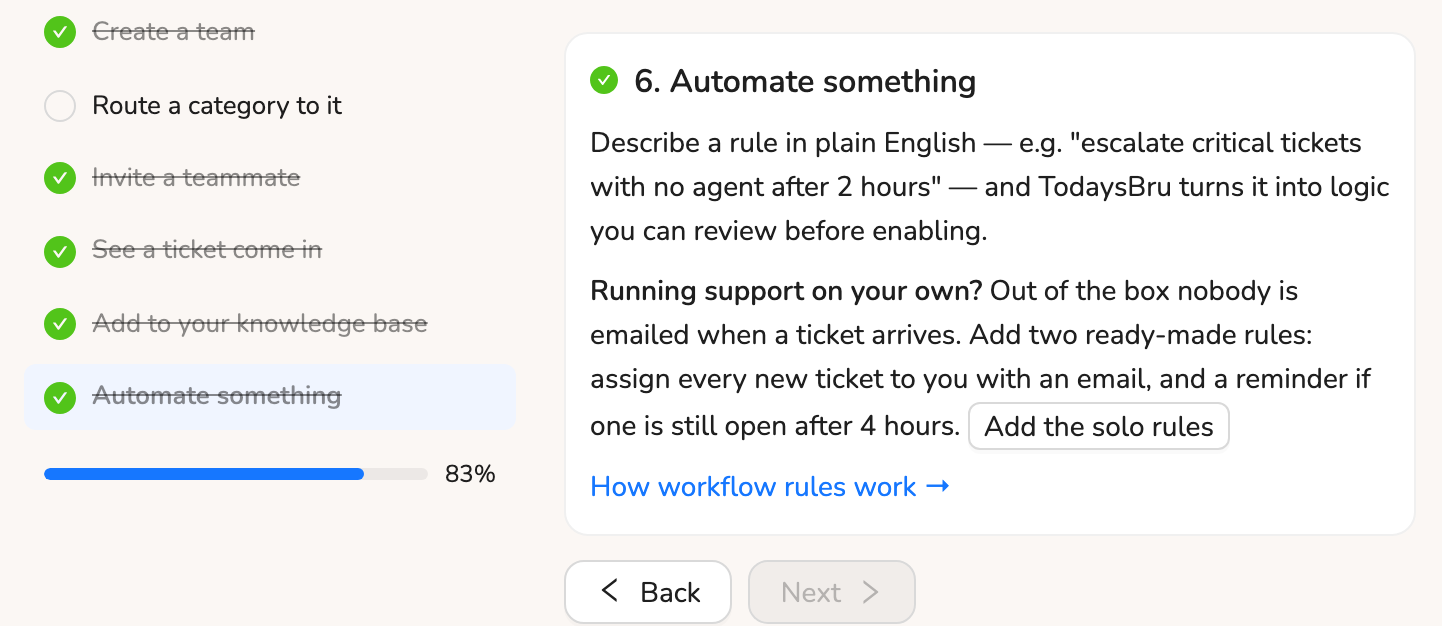
Both are ordinary rules — change the wording or the 4 hours, or switch them off once you bring in a teammate, from Admin →
Workflow rules.The Admin area admin only
Log in as an admin and click Admin in the sidebar. It has five tabs:
Teams, Categories, Users, Workflow rules, SLA settings.Teams
A team is who tickets get routed to — "Desktop Support," "DevOps," "Facilities."
- Add a team: Admin → Teams → Add team, give it a name. A manager is optional, but only existing
manager/adminusers appear as candidates — promote someone in the Users tab first if they're missing. - Edit or delete a team from the icons on its row.
- A team's manager gains the power to reassign any ticket already routed to that team.
Categories
A category is what a requester picks when submitting a ticket, or what the AI chat assigns automatically. Its main job is routing: a new ticket in a category is auto-assigned to that category's default team.
- Add a category: Admin → Categories → Add category, name it, and optionally pick a default team. Leave the team blank to hold off on auto-routing.
- Start with categories that mirror your actual support teams — Hardware, Network, Software, Onboarding — each pointed at the team that owns it. A category with no default team just lands unassigned for a human to triage.
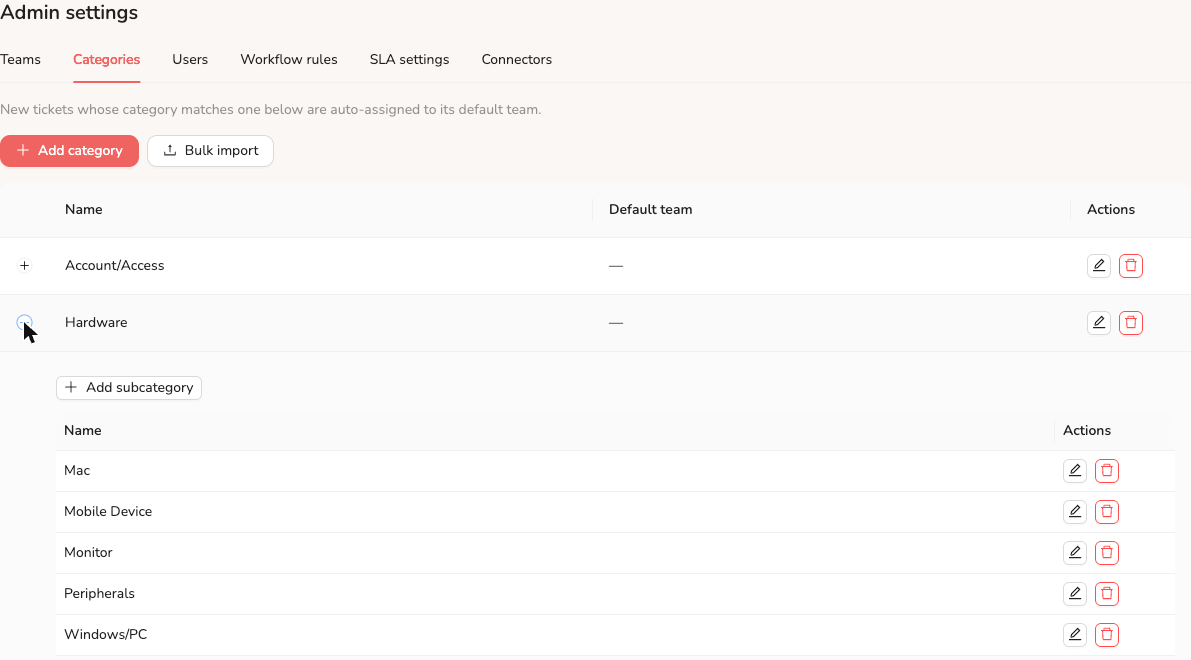
Each category can also have subcategories — a second, optional level of detail (e.g. Hardware → Mac, Windows/PC, Monitor). Expand a category's row to add, edit, or delete them, or set them in bulk via the same CSV import used for categories. Subcategories don't affect routing — that's still driven by the category's default team — they're purely for finer-grained reporting and triage. Like category, TodaysBru auto-classifies a new ticket's subcategory when one is configured for its category; staff can always correct it by hand.
Users
Every account in your workspace, with two controls per row:
- Role — pick
user,agent, ormanagerfrom the dropdown. (Admin accounts show as a fixed tag, per the note above.) - Team — assign or clear which team someone belongs to; this is what a manager's reassignment power keys off.
Data export & account erasure
Two admin-only controls on the Users row, for answering a data-subject request under privacy law (GDPR and similar): a full export of everything stored about a person, and a way to permanently erase their personal data while keeping the ticket record intact.
Export data downloads a ZIP for any user — their profile, tickets raised and assigned, comments they wrote, chat transcripts, uploaded files, approval decisions, ticket history entries, notifications, assigned hardware, request forms, API keys, and workflow rules they created. Internal-only notes on their own tickets are left out (that's the helpdesk's working notes about them, not their data), but any note they wrote themselves — internal or not — is always included. Every signed-in user can also pull their own copy from
Admin → Users → Export data (or ask an admin to run it for them); it's rate-limited to a few pulls an hour since building the ZIP reads a lot of the database at once.
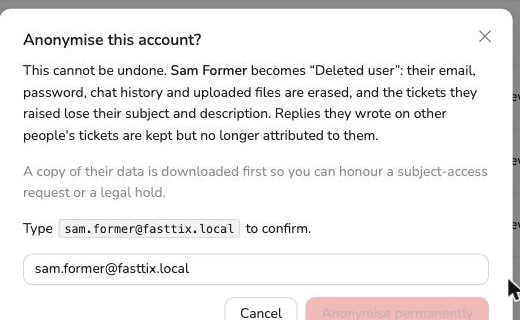
Anonymise is the erasure step, and it's irreversible. It only appears once an account is disabled — disable it from the Status column first, then Anonymise becomes available on that row. Confirm by typing the person's email address. Behind the scenes:
- Their name, email, and password are replaced, and the account can never log in or be re-enabled.
- Tickets they raised lose their subject and description; comments they wrote on those tickets are scrubbed. Their chat history and uploaded files are deleted outright.
- Comments or notes they wrote on someone else's ticket — an agent's reply or internal note — are kept, since that's the helpdesk's record of what was done. Only the byline changes to "Deleted user".
- Any place their name showed up in ticket history or a notification (e.g. "assigned to Jane", "New reply from Jane") is rewritten the same way.
- A copy of their full data export downloads automatically first, in case it's needed for a legal hold.
Admin accounts can't be disabled from this page, so they can't be anonymised either — demote the account to a regular role first if it ever needs erasing.
Approved email addresses
New workspaces start on the free plan, which is limited to a stored list of up to 25 email addresses. Only those people can register themselves, get a password-reset link, or open a ticket by emailing the helpdesk address; anyone else is turned away (inbound mail is dropped without a reply). Your own address is on the list from day one.
Manage the list under
Admin → Email domain: type an address, press Enter, then Save. You can have at most 25. While the free plan applies, the allowed-domains setting below it is ignored, and only TodaysBru can lift the restriction. Adding someone here doesn't create their account — they still register with that address (or you invite them from the Users tab, which always works).SLA settings
How long a ticket of each priority has before it's considered breached, and which clock that time is counted on.
Business hours are the hours your help desk is staffed — out of the box, Monday to Friday, 9:00 AM–5:00 PM Pacific Time, with the common US company holidays (New Year's Day, MLK Day, Presidents' Day, Memorial Day, Juneteenth, Independence Day, Labor Day, Thanksgiving and the day after, Christmas) pre-filled for this year and next. A priority on the business-hours clock only accrues SLA time inside those hours, so a ticket filed Friday at 6 PM hasn't used any of its target by Monday morning. Critical stays on a 24/7 clock by default. Change the time zone, working days, hours, or holidays at the top of
Admin → SLA settings, then click Save business hours.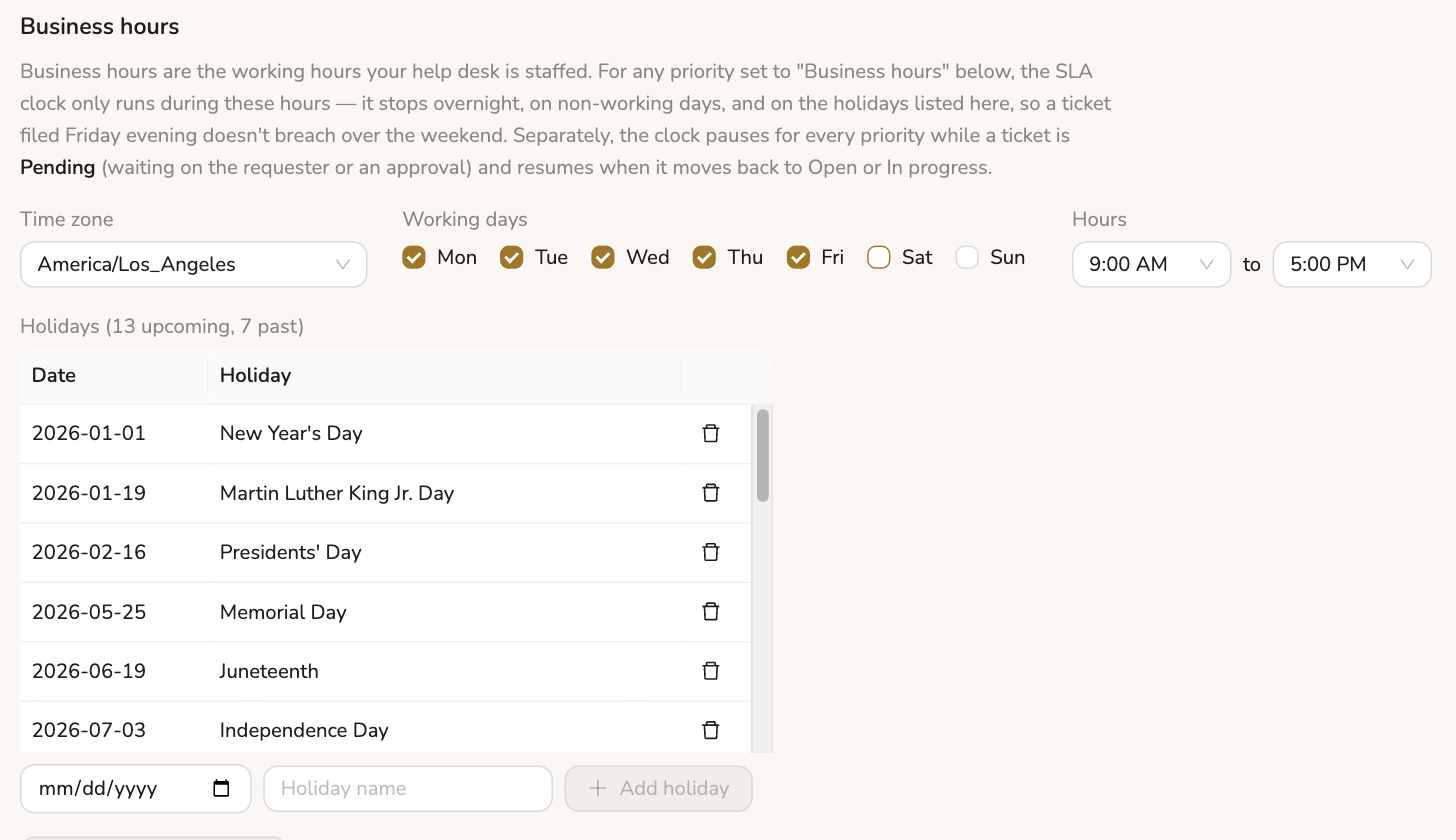
Every priority's clock also pauses while a ticket is Pending — waiting on the requester or an approval — and picks back up when it returns to Open or In progress, so agents aren't penalized for time the ticket was out of their hands.
| Priority | Default target | Clock |
|---|---|---|
| critical | 4 hours | 24/7 |
| high | 8 hours (1 business day) | Business hours |
| medium | 40 hours (5 business days) | Business hours |
| low | 240 hours (30 business days) | Business hours |
In the targets table, pick Business hours or 24/7 for a priority's clock, enter a new target in hours, and click Save. The warning threshold — the point where the dashboard flags a ticket amber before it fully breaches — is a fixed percentage of the target and isn't separately editable.
Priority is usually set automatically: TodaysBru classifies incoming tickets, and bumps priority up one level (never past
critical) when the requester's message reads as frustrated. Staff can still override it by hand on the ticket.Each automatic choice shows up in the ticket's Activity as Auto-triage, with a one-line explanation. If the priority couldn't be judged, the entry says the default (medium) was used. Critical is kept for outages the requester says affect more than just them, so a short "my network is down" comes in as high.

Workflow rules
Automation described in plain English instead of configured by hand — for example, "When an Onboarding ticket is resolved, provision an Okta account for the requester," or "If a critical ticket has no agent assigned after 2 hours, escalate it to the team manager."
- Admin → Workflow rules → New rule, describe it, click Parse with AI.
- Review what it parsed into — trigger, conditions, actions — and check any warnings the assistant raised about unexpected behavior.
- Click Preview matching tickets to see which currently open tickets would match, before committing to anything.
- Save. Rules are always created disabled — flip the switch in the table once you're satisfied.
The AI runs once, to translate your English into structured logic when you create the rule. After that, rules run deterministically against every new or updated ticket — no AI call in the hot path — and each rule fires at most once per ticket.
See it end to end: watch a rule get authored, reviewed, and fire on a real ticket.
Want the practical version? Read the guide to automating ticket routing without code.
For automations that are richer than one sentence, use the Advanced designer — the button next to New rule. It's a structured editor over the same rule engine, laid out as a flowchart: a When node at the top, then a vertical chain of step nodes, with a fork drawn as a split — a branch where the first matching arm runs and the rest are skipped. Click any node to edit it in the panel on the right: pick a starting point (a ticket is created or updated, a specific request form is submitted, or a phrase shows up in the ticket text), set what each step does, or shape the fork's arms. Every row in the table also has an Open in Designer action. A rule that contains a fork can only be edited in the designer afterwards — it's shown with a
Designer tag and its plain-English edit controls are turned off. Designer-authored rules are created disabled, exactly like the plain-English ones.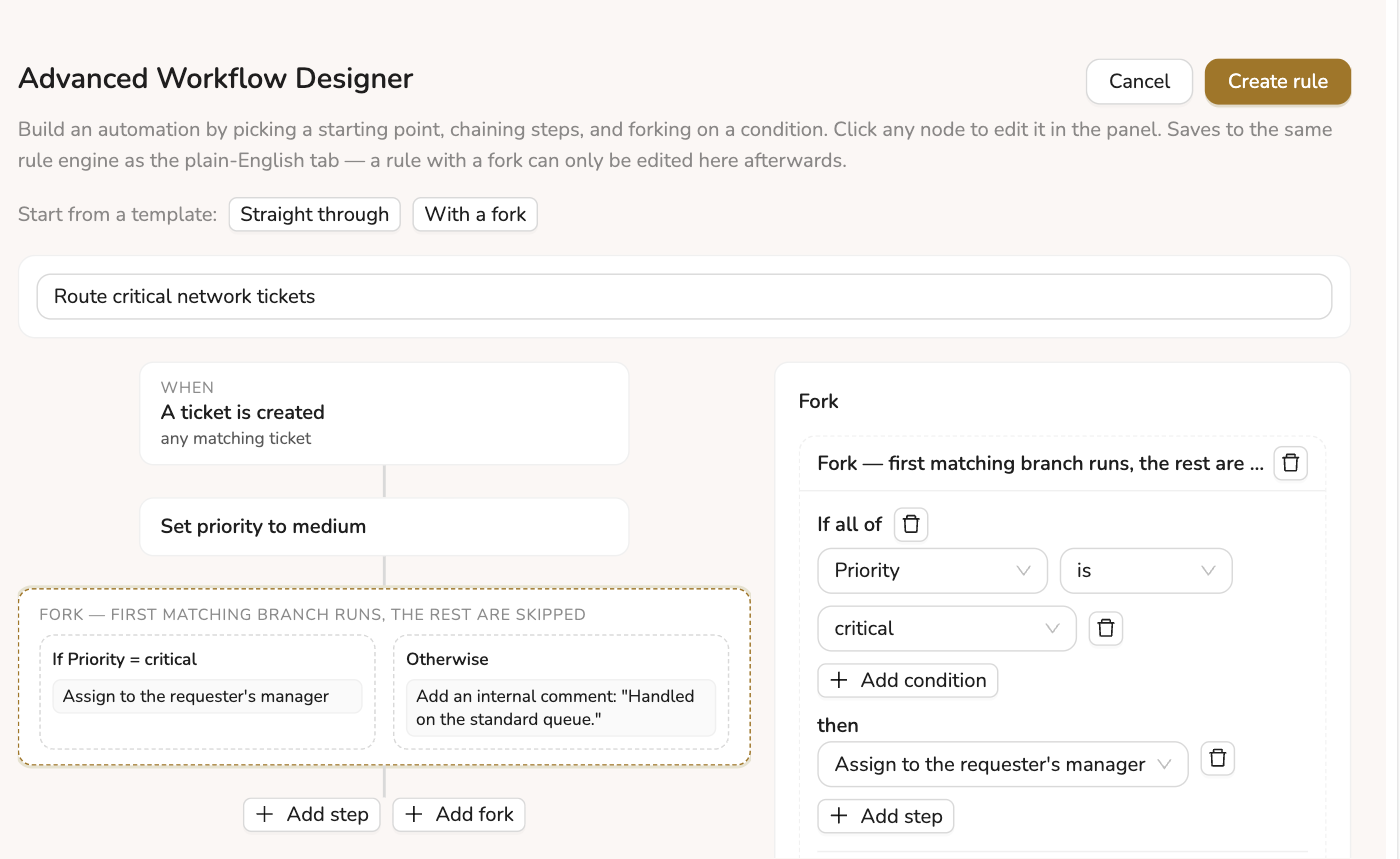
Request forms
Structured intake for the requests people file over and over — a laptop, an access grant, a new hire. Describe the request in plain English under Admin → Request forms, review the fields and routing the assistant generates, then enable it. Like workflow rules, forms are created disabled and the AI is never consulted again once saved: routing runs as fixed rules against whatever gets typed in.
Forms can also arrive from the external forms builder, which publishes into TodaysBru over the integrations API. A published form is never live on arrival. It lands in the table marked Published from the forms builder with a Review button, and stays invisible to everyone until an admin approves it.
- Nothing publishes itself. An API key can stage a definition but never open an intake path. That matters most for routing that auto-approves — submissions matching such a rule become tickets with no approval step at all, so the review dialog calls it out explicitly.
- A republish never disturbs what's live. When the builder republishes a form you've already approved, the version currently serving keeps serving; the new one waits its turn in the review queue. Approving swaps them over.
- The builder owns the definition. You can edit a published form here, but the next approved publish overwrites your changes — the builder republishes in full every time.
Change management
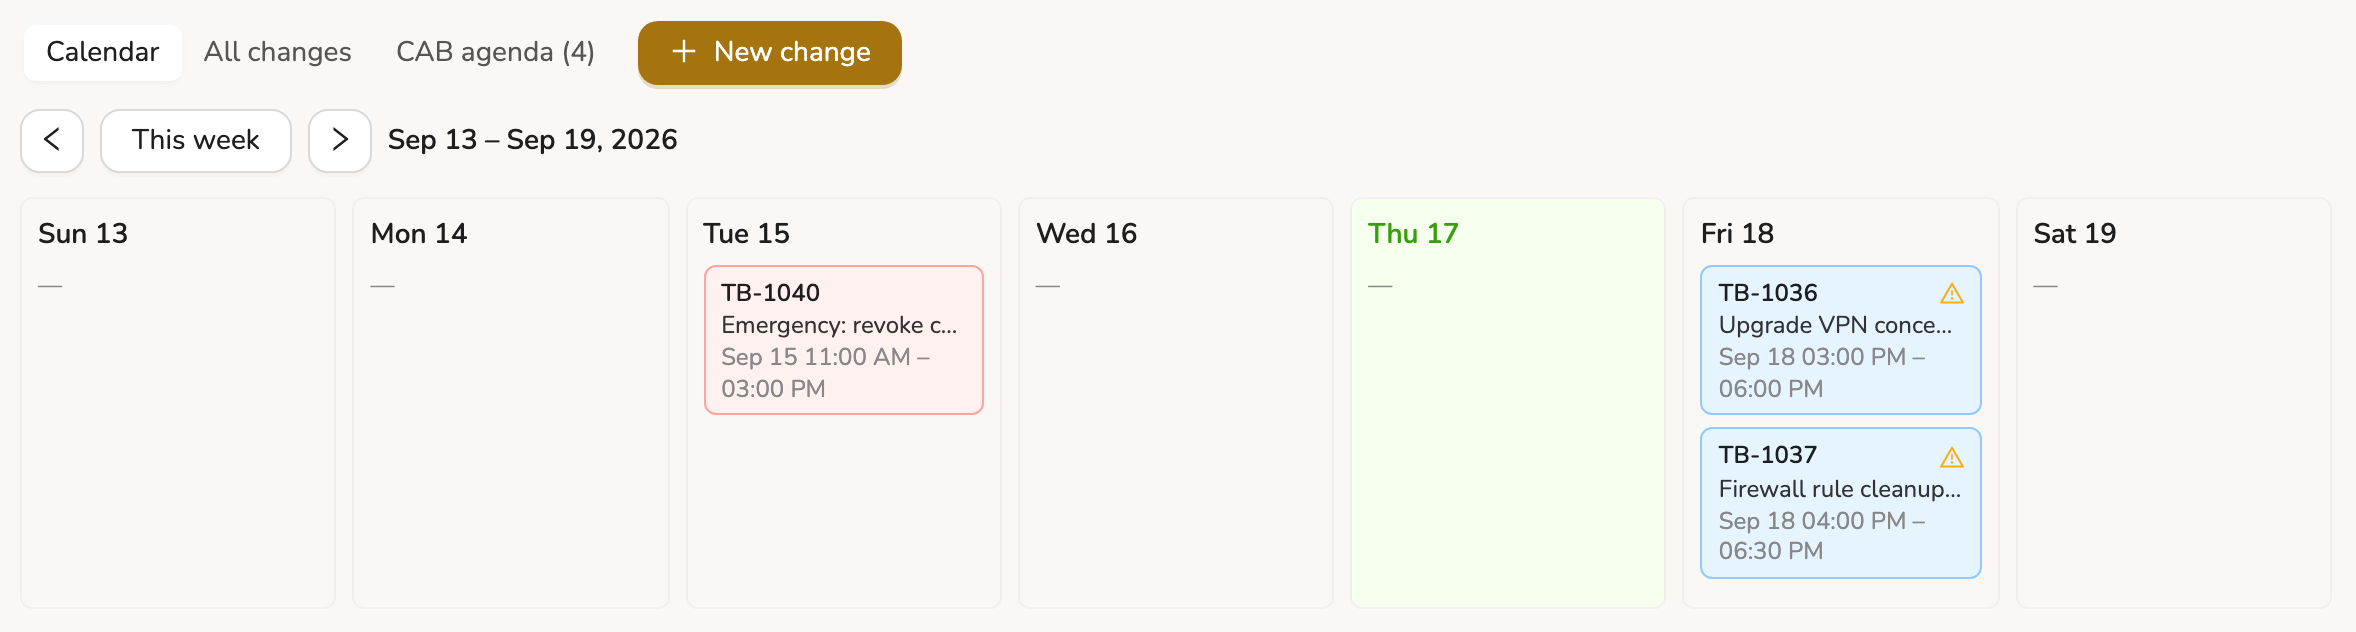
A change is a ticket of type Change with a plan attached: what's changing, when, which services it touches, and how to back it out. Staff raise one from the Changes page, which also shows the week's calendar, the CAB agenda, and a warning wherever two changes overlap on the same service tag. Approvers decide from the change itself, and the ticket can't be started until it's approved or closed until an outcome is recorded.
- Three types. A normal change goes to the requester's manager, then any one member of the CAB team. An emergency change needs one CAB approval and is allowed inside a freeze window. A standard change is pre-approved by its template and skips approval entirely.
- Admin → Change management sets the CAB team, the freeze windows (quarter close, launches), and the standard-change templates. Keep standard templates to routine, low-risk work: that's the one path with no approver in it.
- Outcome on close. Recording a change as failed or rolled back needs a short review, and TodaysBru drafts a post-implementation review from it on the ticket.
Knowledge base
The Knowledge Base page, in the main sidebar, holds self-service articles — password resets, VPN, printer issues. Anyone can browse it, and the AI chat and ticket-suggestion features search it automatically.
See it end to end: watch a Mac user get Mac-only steps straight from a KB article.
Admins get one extra panel: Suggested KB articles. TodaysBru periodically scans resolved tickets for recurring issues no existing article covers, drafts a new one, and has a second AI model independently vet the draft before it reaches you. From there you can:
- Review each suggestion — with its vetting verdict, notes, and source tickets.
- Edit the draft in place.
- Publish it as a real article, or reject it.
There's no blank-page article editor yet — new articles only come from publishing a suggestion.
See it end to end: watch a gap get drafted, vetted by a second model, and published.
Working tickets
Not admin-exclusive, but worth knowing as the person setting expectations for your team.
Internal vs. visible notes
The note composer defaults to internal (hidden from the requester). Uncheck it to post a reply they’ll see. A requester can reply too, but can never post an internal-only note.Suggested resolution
Every ticket surfaces matching KB articles and similar resolved tickets automatically.Suggest reply
Drafts a reply grounded in the KB and thread history, fills the composer, and correctly unchecks "Internal note" since it’s addressed to the requester.Summarize for colleague
An on-demand thread summary — useful when handing a ticket off or reassigning it.Incident correlation
Tickets reporting the same issue get linked; when the root ticket resolves, TodaysBru drafts a postmortem visible to staff across the cluster.Frustrated flag & SLA dot
A staff-only "Frustrated" tag flags tone that also triggers the priority bump; a red/yellow dot on the ticket list flags breached or at-risk tickets at a glance.Attachments
The requester or staff can attach an image directly on the ticket — e.g. a screenshot of an error. Images only, up to 10 MB; anyone who can view the ticket can view and download them.
Team column
Staff only: the ticket list has a "Team" column showing which team a ticket is routed to, filterable and sortable like any other column. Hidden by default — turn it on from the Columns menu. Requesters never see it.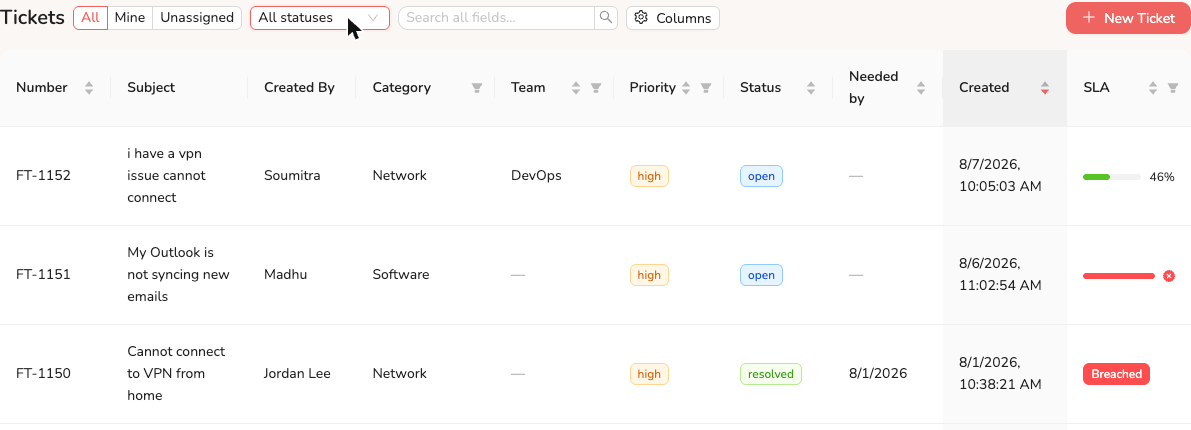
Customer satisfaction (CSAT)
The moment a ticket closes, the requester gets an emailed link to a quick 3-question survey: a 1-5 rating, what went well, and what could've gone better. A submitted response notifies the assigned agent by email/Slack/inbox with the results. The link is one-time use and works without logging in.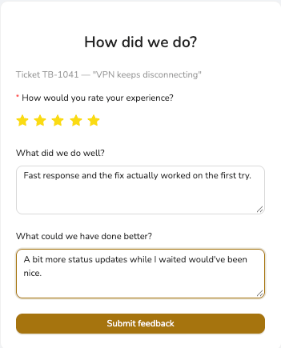
Picking up tickets & bulk actions
On the Tickets page, in Table view, tick the checkbox on any rows to select them, then open Bulk actions to Mark resolved, Mark closed, Assign to me, or Assign to team… in one go. Selection covers the page you're on (25 tickets), and tickets already in the target state are skipped.
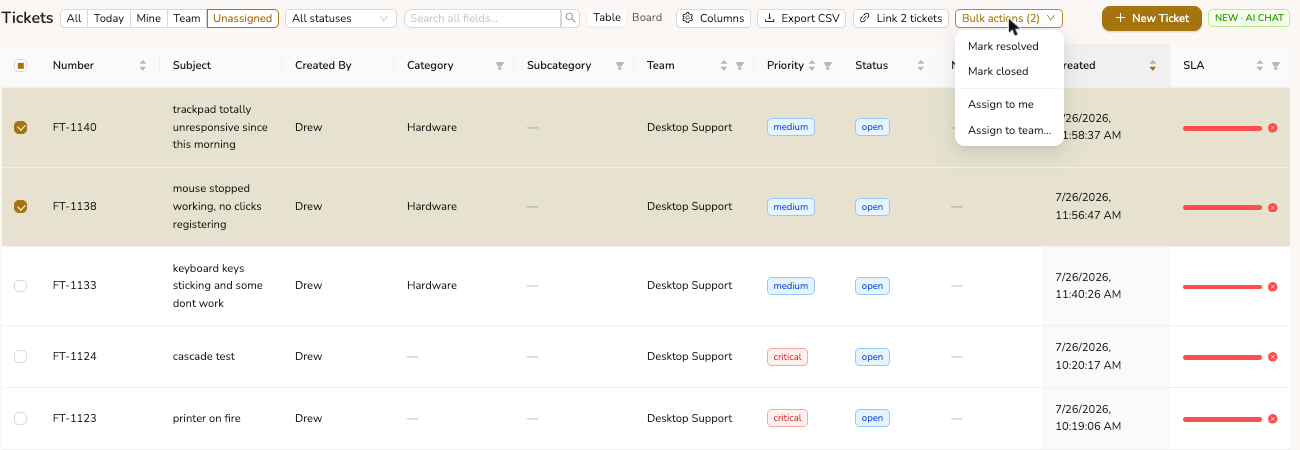
To pick up new work, switch the list to Unassigned, select the tickets you're taking, and choose Bulk actions → Assign to me — or open a single ticket and click Assign to me at the top. Once a ticket is yours you can update, resolve, or close it, one at a time or in bulk.
| Role | Can claim | Can update, resolve & close |
|---|---|---|
| agent | Open, unassigned tickets in their team’s queue | Tickets assigned to them, or that they opened |
| manager | Open, unassigned tickets in their team’s queue | Any ticket routed to their team, plus their own |
| admin | Any ticket | Any ticket |
Agents can't take over or close a ticket a teammate is already working — ask your team's manager to reassign it. If some tickets in a bulk action can't be changed, the rest still go through and you'll see "X of N tickets could not be updated" — usually a ticket that isn't yours yet, or a change still waiting on approval.
Reports
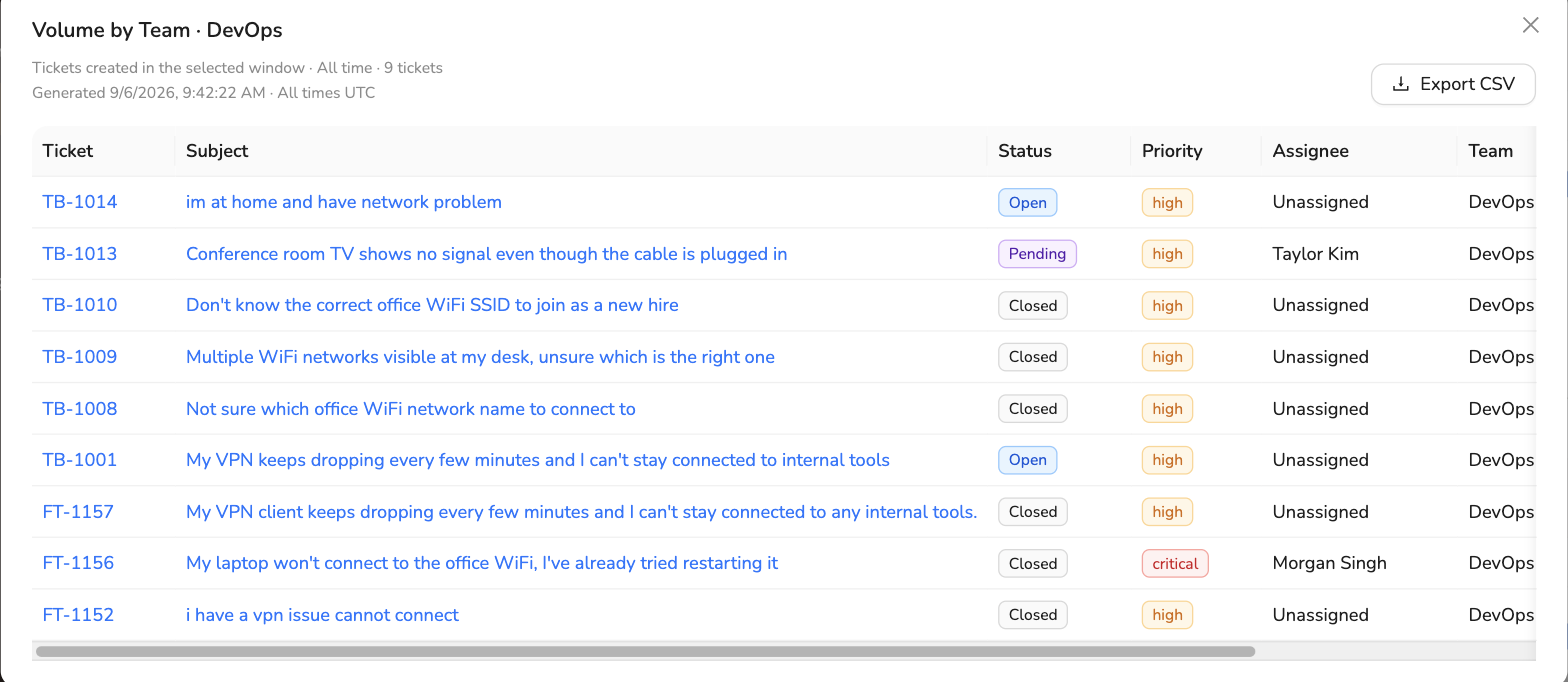
The Reports page — agents, managers, and admins — rolls ticket activity up into charts: volume by category, priority and team, ticket aging, SLA compliance, and per-agent workload and throughput. The day-range control at the top scopes every windowed chart at once, and Export CSV downloads the whole page as one file.
Every bar is a link. Click one and a report opens listing the individual tickets behind that number — with a header naming the cut, the time window, and the row count — so you can go from "SLA compliance dipped for the Network team" to the exact tickets that missed. Clicking a chart's title instead opens the same report for every ticket in that chart, all bars together. Rows link straight to the ticket, and that view has its own Export CSV. The report cut lives in the page URL, so a drilled-in view can be refreshed or shared as a link.
Hardware assets
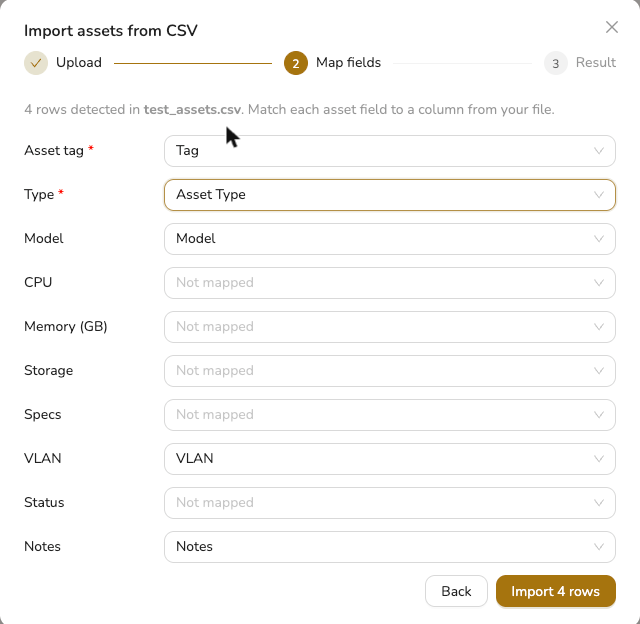
The Assets page — visible to agents, managers, and admins — tracks hardware assigned to each person: laptop, monitor, dock, phone, with tag, model, and specs. It's context for support, not something that drives routing or SLAs.
Import CSV bulk-creates assets from a spreadsheet. Download the template if you're starting from scratch, or upload your own export as-is — the next step lets you match each asset field to whichever column in your file holds it, so your headers don't need to match ours. Rows that fail validation (e.g. an unrecognized type) are skipped and listed individually; everything else still imports.
Ways to open a ticket
Web form
The "New Ticket" button on the Tickets page.AI chat
Describe the issue in plain English; the assistant resolves it inline or drafts a ticket, and flags a matching open ticket if the requester already has one. It stays on topic — asked for anything unrelated to your helpdesk, it declines and redirects instead of answering.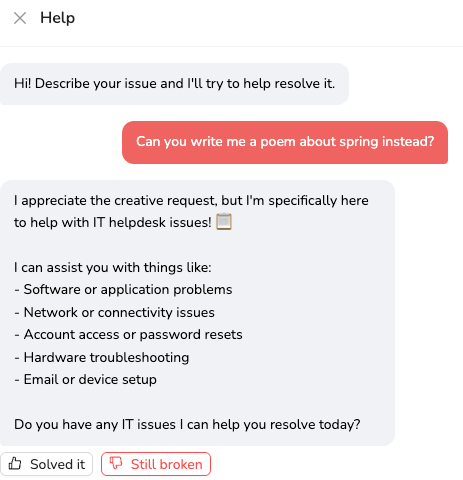
Related open tickets
If a chat looks related to a ticket you already have open and you click "Still broken", the assistant asks whether to add the conversation to that ticket or create a new one. Cancel to keep chatting instead. If that ticket has been closed in the meantime, a new ticket is created without asking.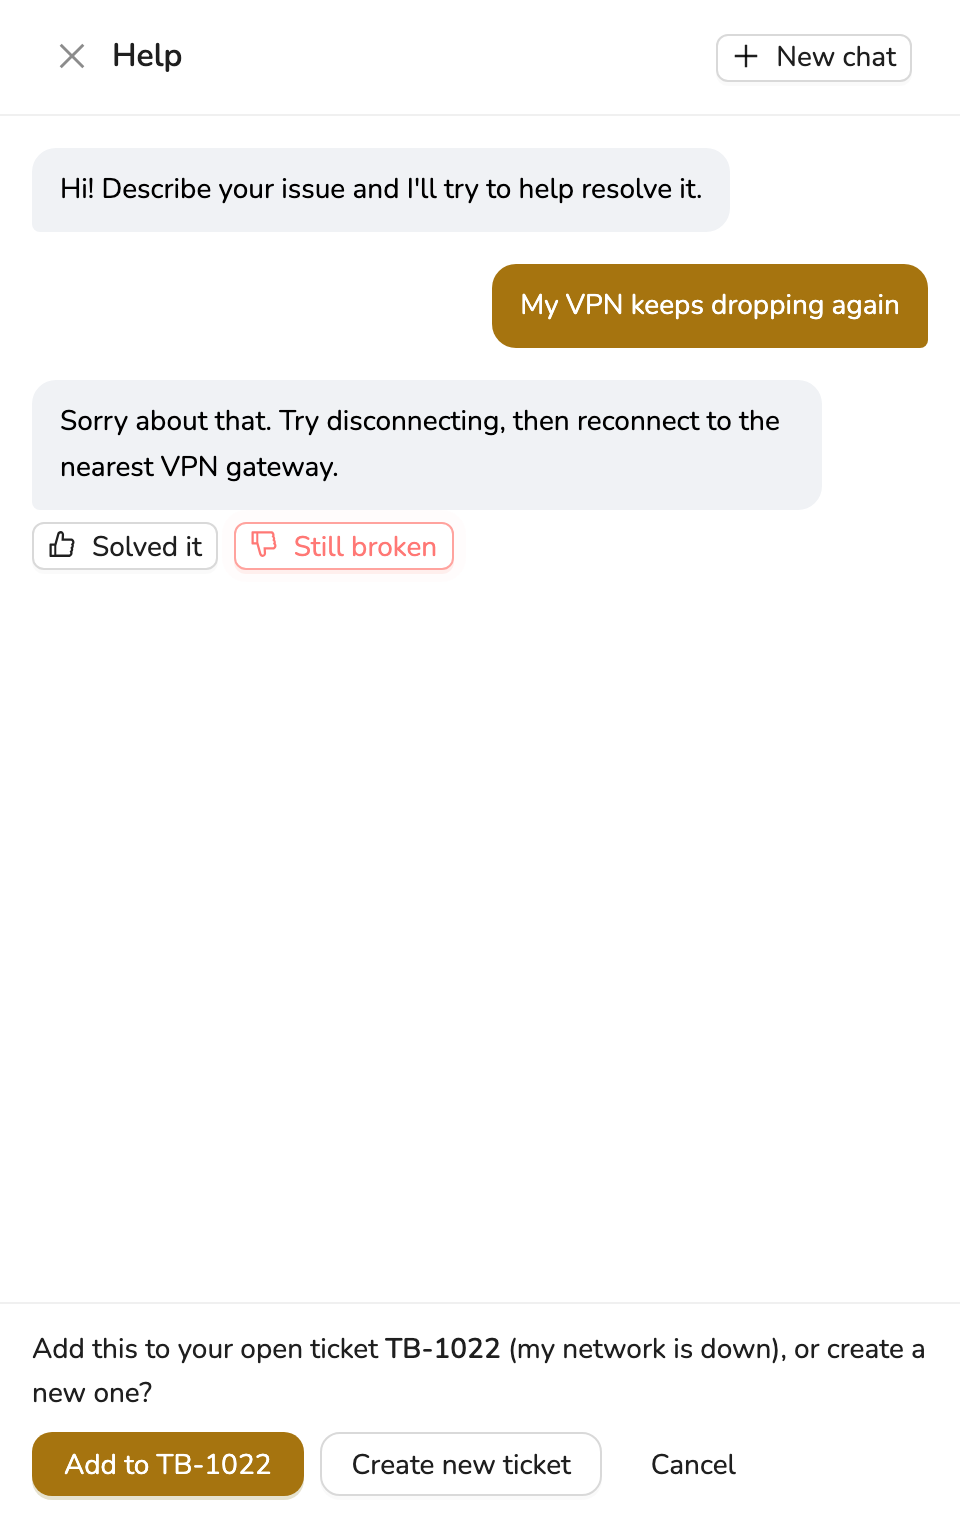
Picking up a chat
The chat opens on the Tickets page and brings back your last unfinished conversation, even after you close it or reload. Click "New chat" to start over. A chat that ended in "Solved it" or a ticket starts fresh next time.Past chats
Chat history in the sidebar lists every conversation you've had with the assistant, newest first, with whether it was solved or ended in a ticket. Open one to read it back, or click the ticket number to jump to that ticket. You only see your own chats.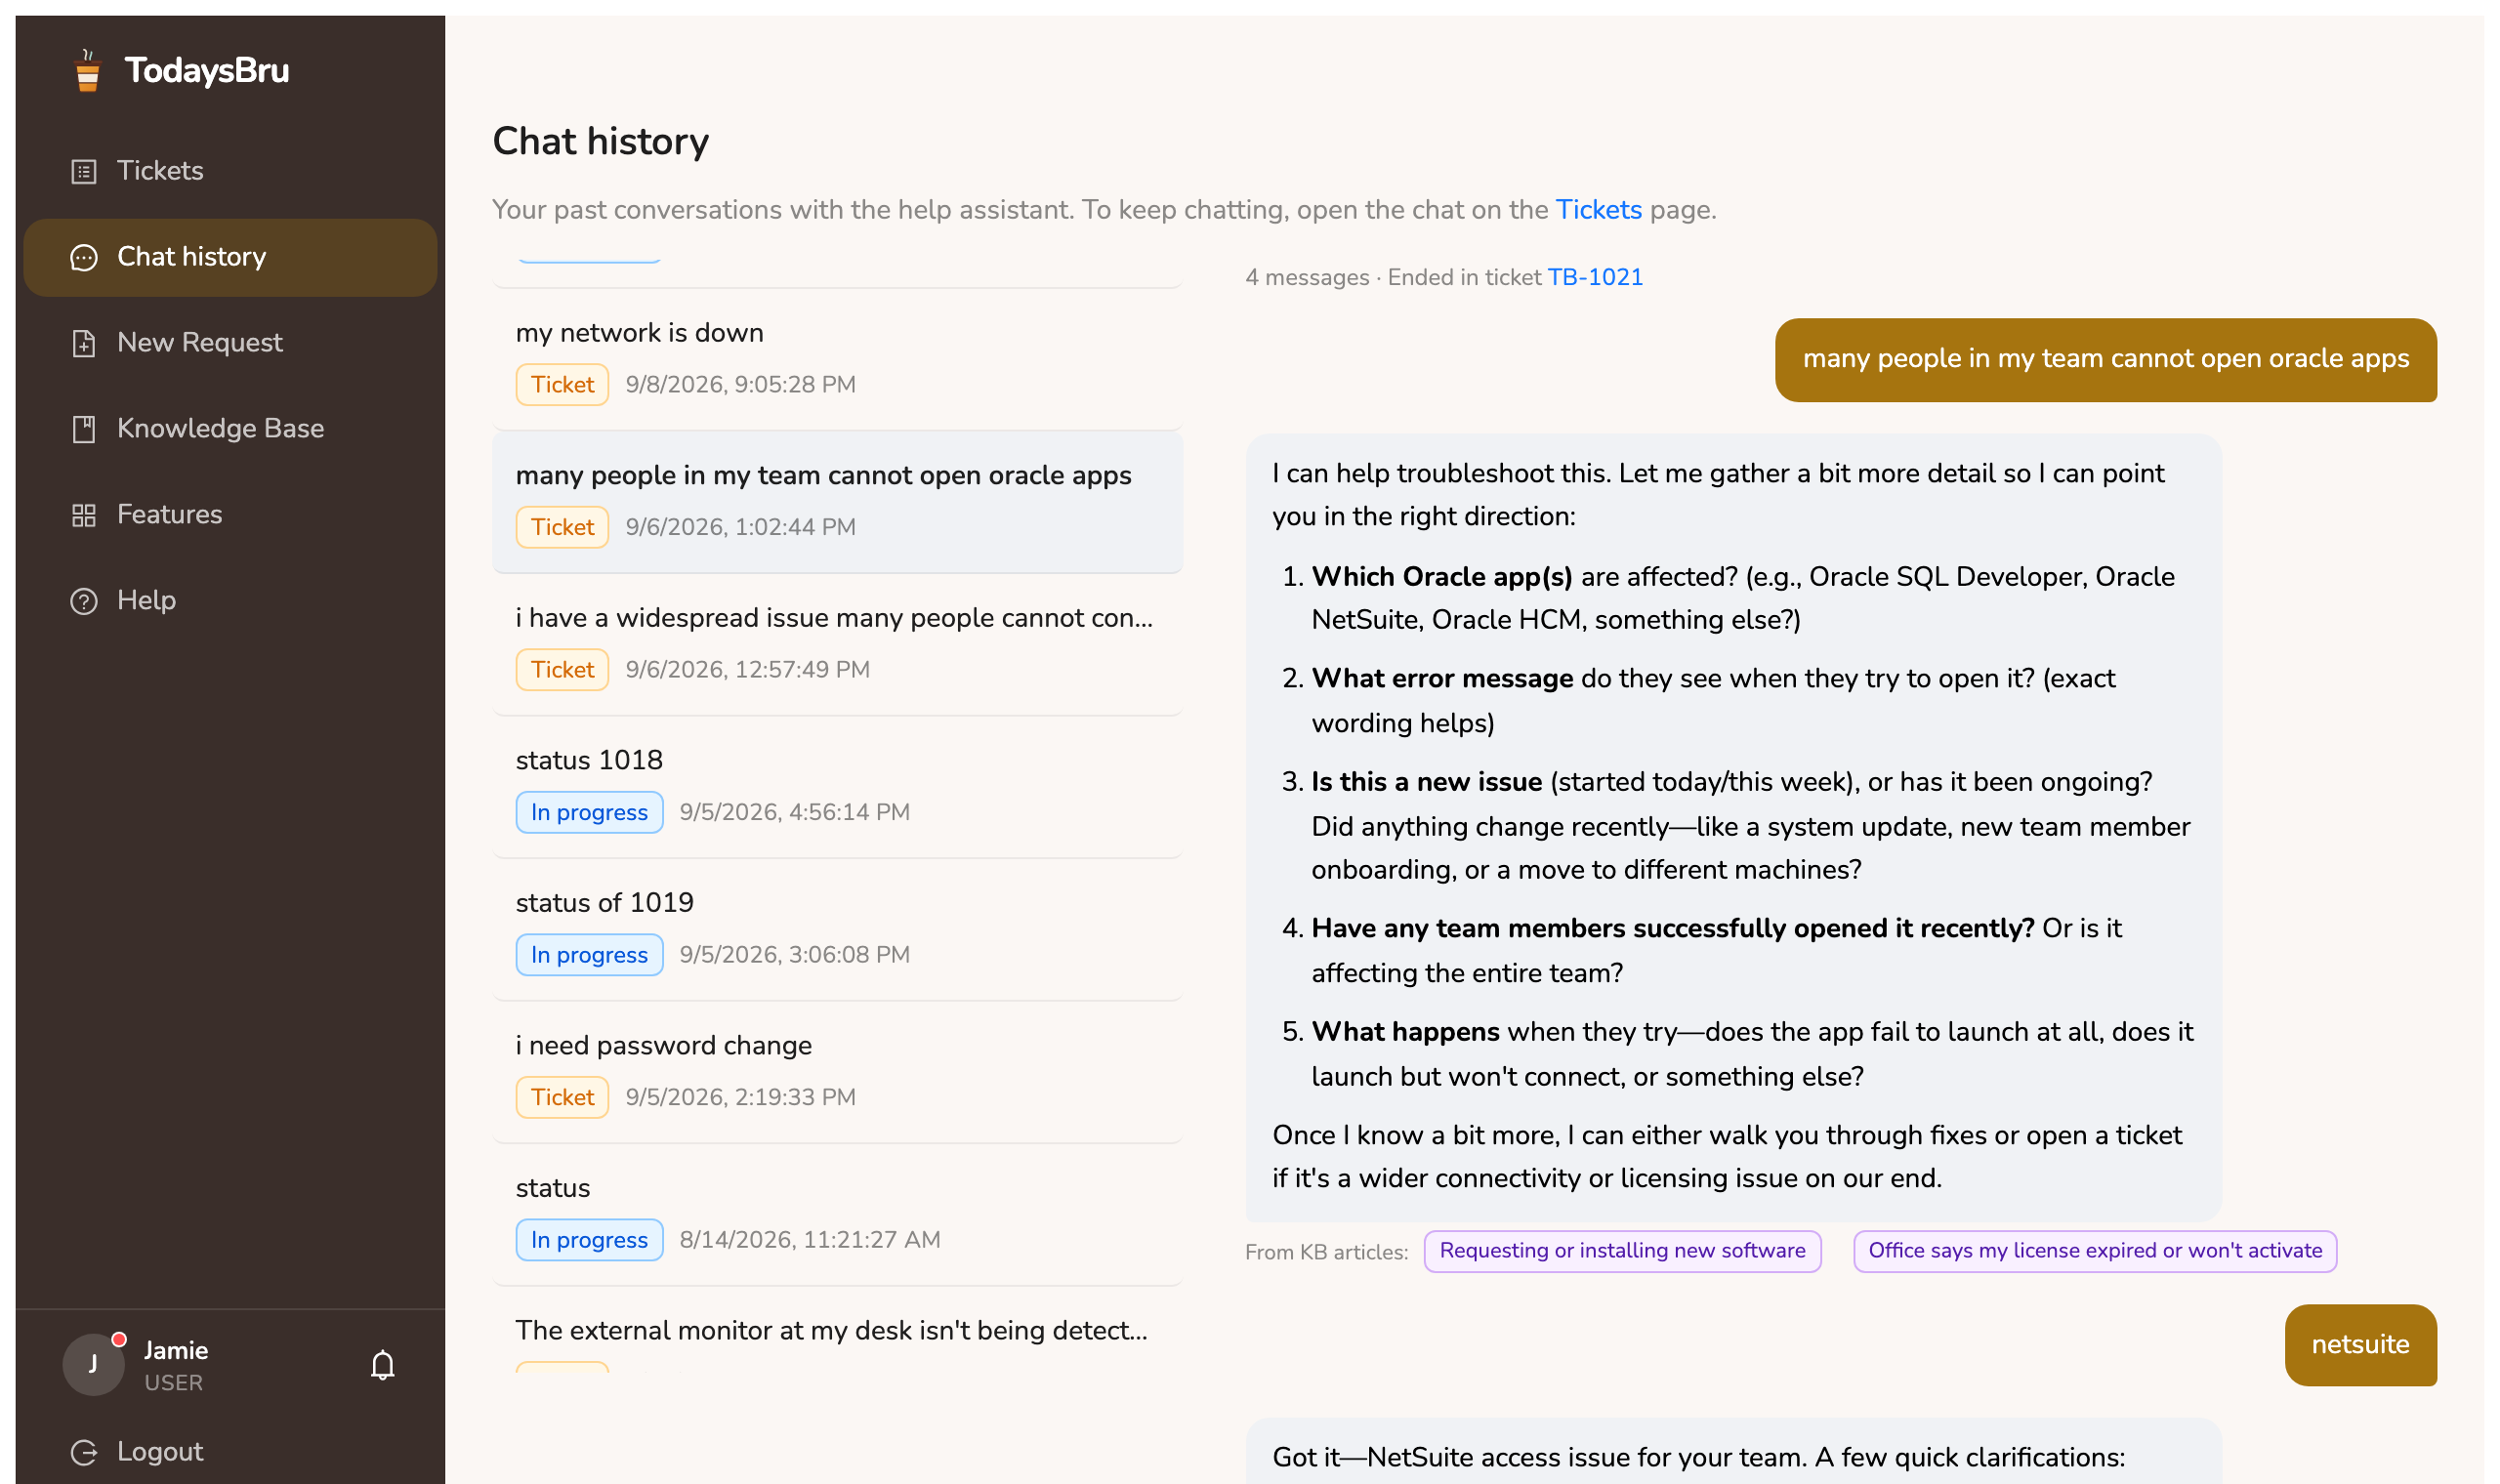
AI-filled request forms
If a request matches one of your admin’s request forms (e.g. "Request a Company Laptop"), chat recognizes it automatically, asks about whichever required fields are still missing one at a time, shows a summary, and only submits once you confirm — same approval routing as filling it out on the New Request page.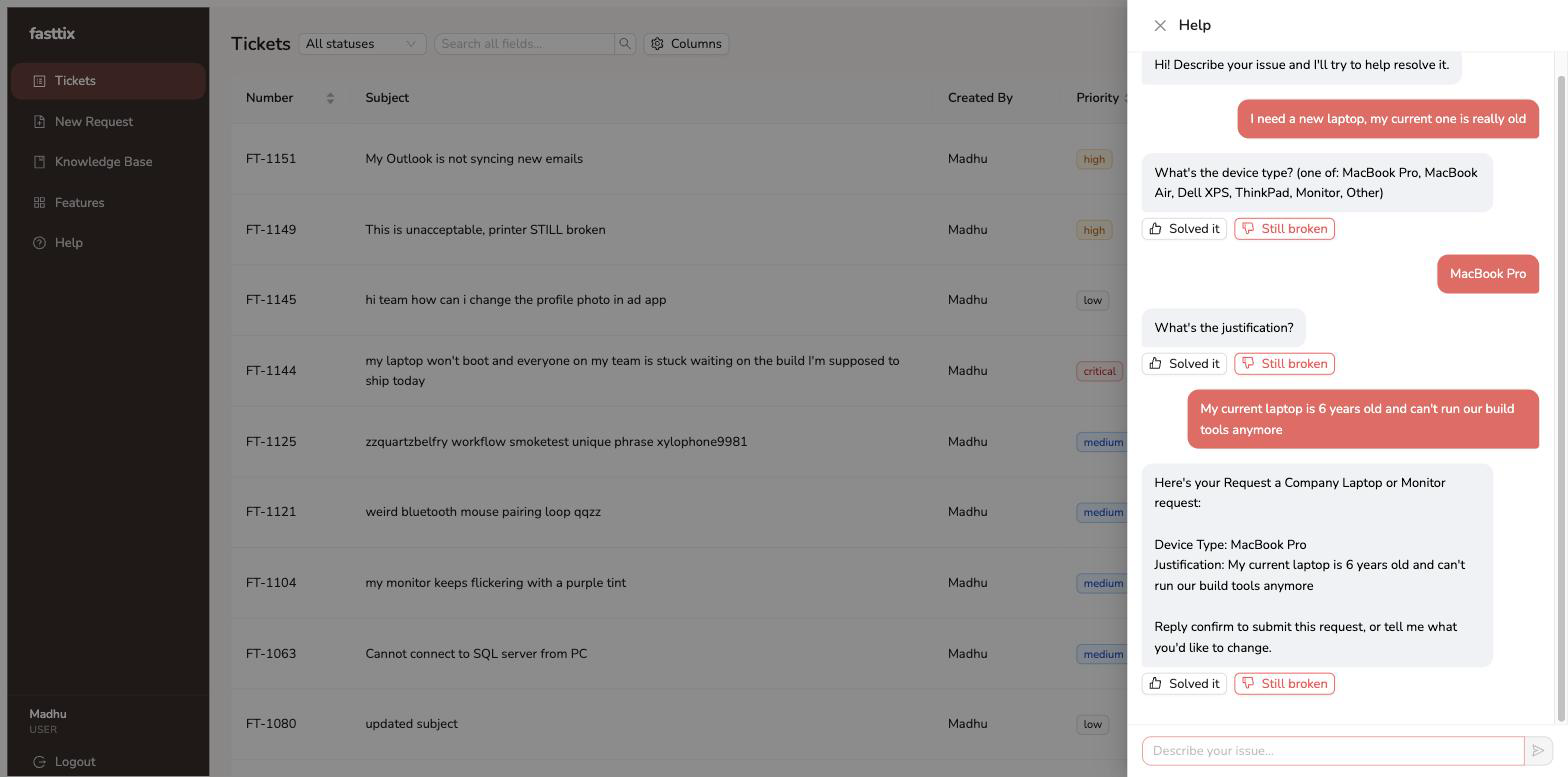
Slack
If a Slack bot is connected, requesters can DM it the same way they’d use the chat widget. Channel monitoring isn’t supported — DMs only.Plans
TodaysBru is currently in early access — every workspace is on the same Free plan below. Paid tiers with higher limits are coming; if you're bumping up against one of these, reach out to your TodaysBru operator.
| Free plan | Limit | Notes |
|---|---|---|
| New tickets | 100 / day | Across every way a ticket gets created — web form, AI chat, email, request forms. |
| Inbound email | 50 / day | Emails that turn into a new ticket or a reply on an existing one. |
| Outbound email | 50 / day | Confirmations, replies, and notification emails TodaysBru sends out. |
| Approved requesters | 25 | Email addresses that can register or email in tickets (Admin → Email domain). |
Limits reset at midnight and apply per workspace, not per person. Hitting one doesn't lose any work — a ticket-creation channel that hits the daily cap simply pauses until it resets.
What you can't change yourself
Lifting the free-plan restriction to your approved email list, and the general framing of what kind of requests your helpdesk handles (e.g. "IT helpdesk" vs. a broader internal help desk for non-IT teams), aren't in Admin yet. Reach out to your TodaysBru operator if you need either adjusted.